I'm a Content Manager at MemberSpace helping entrepreneurs and creators sell digital products.
If you’ve established a strong presence on LinkedIn and have an engaged community of connections, you might be wondering how to start monetizing your network. Creating a paid LinkedIn Group can be a great way to generate revenue while providing even more value to your community.
While it’s technically against LinkedIn’s terms of service to directly sell access to your group, there are still plenty of ways to monetize your online community without violating any rules. The key is to build a community membership on your own website using a platform like MemberSpace. By doing this, you can charge members for access to exclusive content, resources, or services, and then invite them to your LinkedIn Group as an added bonus.
Here are some examples of how you can monetize your LinkedIn Group:
Host a private podcast for your community members and, as part of the subscription, give them access to your private LinkedIn group. This way, they can discuss the podcast episodes, ask questions, and network with other listeners.
Sell an ebook and, with a purchase, invite members to join your LinkedIn group to discuss the book and related topics, network, etc. This creates a built-in audience for your book and provides additional value to your readers.
Create and sell an online course and give students access to your LinkedIn group when they purchase the course. The group can serve as a place for students to ask questions, share their progress, and connect with other learners.
Build and sell a content library of resources like templates, guides, etc., and invite your subscribers to your LinkedIn group.
Now that you have some ideas for monetizing your LinkedIn Group, let’s walk through five easy steps to make it happen!
Join our community of membership business owners!
Free resources, templates, and workshops to grow your business.
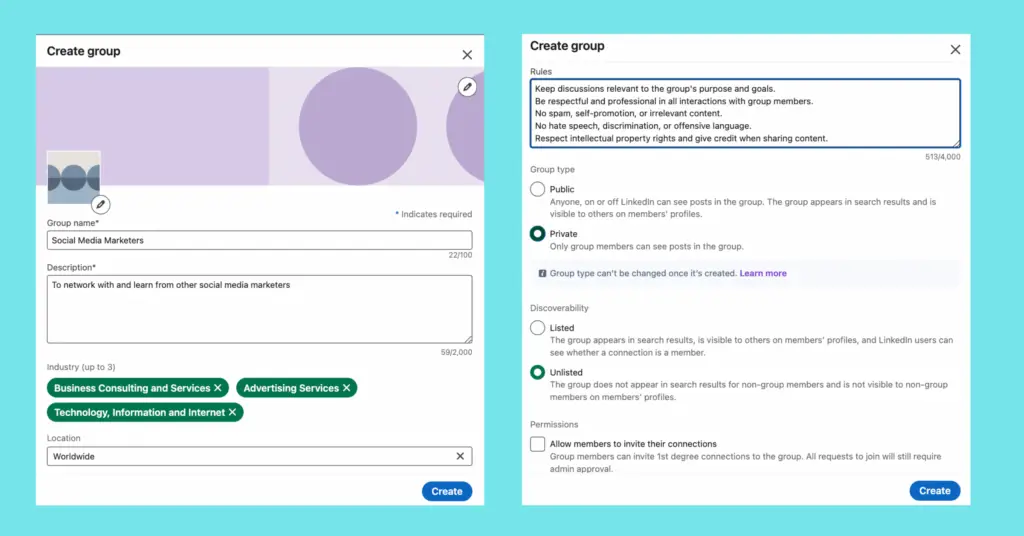
To open your new community, visit the LinkedIn Groups page on your account and click Create Group. You’ll need to add a group name, description, rules, location, discoverability (listed or unlisted), and permissions (public or private).
A couple of things to note:
You can’t switch your group from public to private once you open it, so be sure to make it private!
“Allow members to invite their connections” should NOT be checked off – you want to make sure you are the only one who can invite people (after they pay, of course!)
Anyone can create private LinkedIn Group. Visit the Groups page on your account and fill in some details like a group name, description, and rules.
Step 2: Install MemberSpace on your website
To create your community membership, protect exclusive content on your website, and sell membership access, you’ll need to install MemberSpace on your website. It works with any CMS and takes just a few minutes to add the snippet of code.
To install MemberSpace, all you need to do is add a snippet of code to your website. We have install instructions, so no tech experience needed!
Step 3: Set up your membership
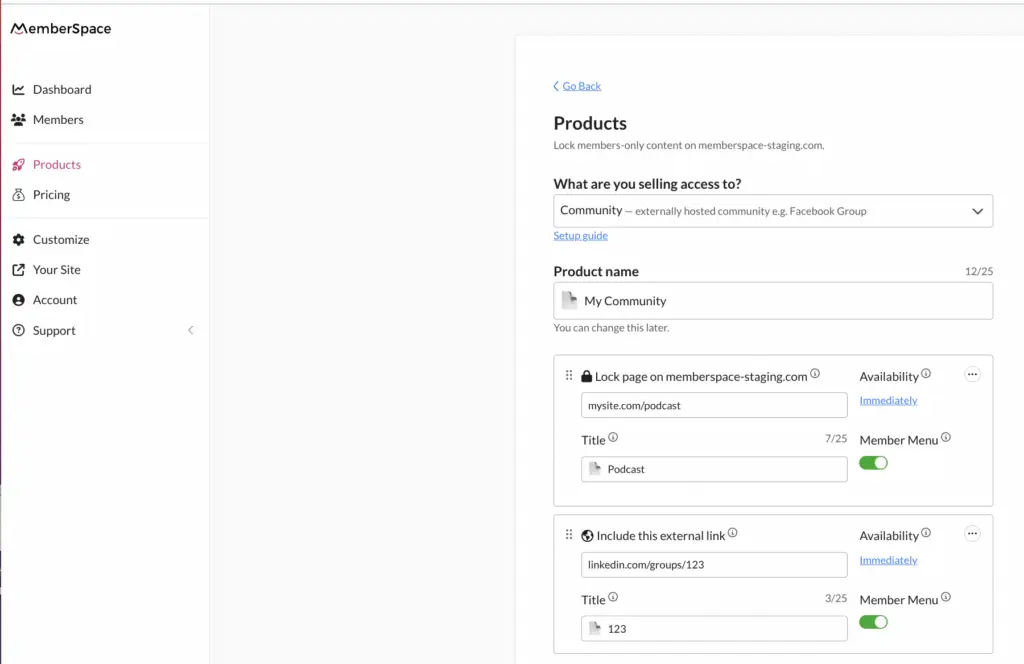
In order to sell access to your community, you’ll need to set up a membership and protect the content that you plan on offering your members – your LinkedIn Group, a podcast, online course, etc.
To do this, open up your new MemberSpace account and go to Products > Add Product. Select Community and add the URLs for the pages you want to lock on your website, as well as the LinkedIn Group link (by clicking Include external link).
After you add your links, be sure to enable the Member Menu! This will add a floating button on the bottom right corner of your website that allows people to login/signup and then access links to your LinkedIn group, as well as your other membership offerings.
In this example, the online community includes a private podcast and LinkedIn Group.
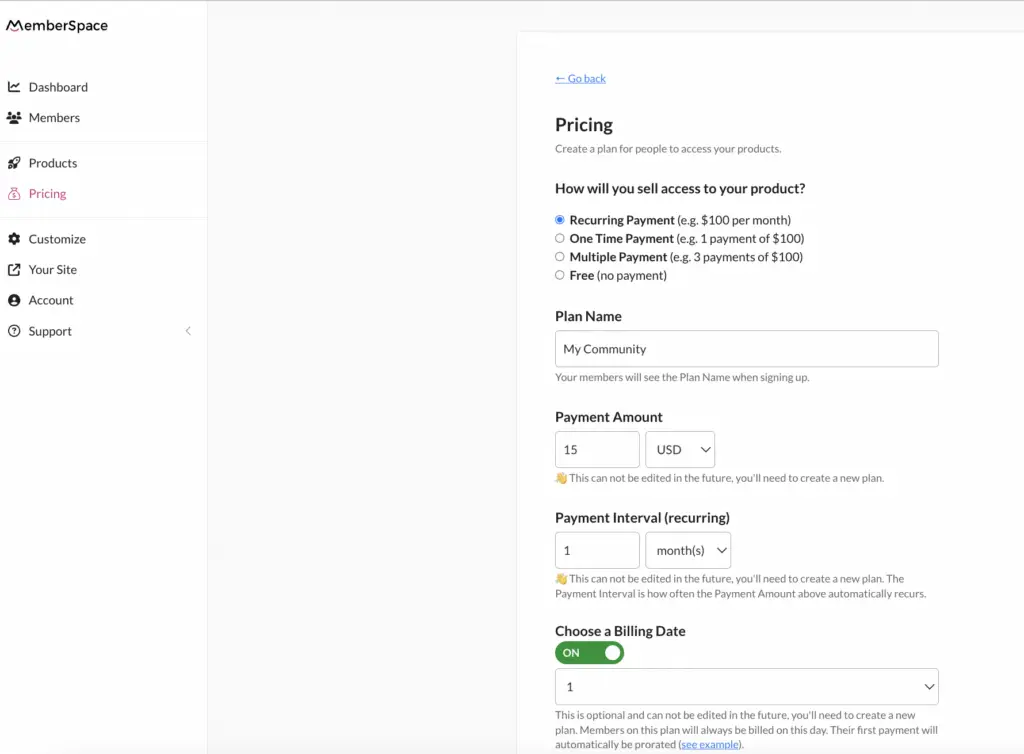
Step 4: Set pricing
Once you’ve created your membership, it’s time to decide what you’ll charge subscribers. MemberSpace has a built-in integration with Stripe, so you can process payments easily and securely on your website. Depending on how you structure your community, you can accept one-time, recurring, or multiple payments, and set up different membership tiers if you want varying levels of access to your community.
After you’ve set up your community membership and pricing, customers will be able to sign up on your website and pay via credit card, Apple Pay, or Google Pay.
With MemberSpace, you can charge your community members however you'd like with the built-in Stripe integration.
Step 5: Invite connections to join your LinkedIn Group
After members join your online community, you’ll need to invite them to your LinkedIn Group (there’s an Invite Members button next to the group name). If you’d prefer, you can also have your members request to join your group instead, and then you will add them. Just be sure to give them access to the group link via:
The Member Menu,
A welcome email (this can be automated with MemberSpace), OR
A community dashboard on your website
Final Thoughts
If LinkedIn is where your online community spends a lot of there time, it’s a great idea to consider monetizing your connections by creating a private, paid LinkedIn Group. The key is to create a membership on your own website using a tool like MemberSpace. This lets you charge members for exclusive community resources. After they pay, you can invite them to join your private LinkedIn Group as a bonus. To get started, sign up for a free MemberSpace trial!
Join our community of membership business owners!
Free resources, templates, and workshops to grow your business.